- Please copy this template (copy either the markdown by clicking Raw or the copy directly from this preview) and use it to create your guide in your preferred medium.
- This template includes information required in all PagerDuty integration guides.
- Template instructions in bold italics are intended to provide guidance or examples, and should be deleted and/or replaced once you’ve added your content.
- If your integration does not follow the same flow as what we’ve provided below (e.g. steps begin in your tool’s UI as opposed to the PagerDuty UI, etc.), feel free to make the changes you need to reflect the flow of the integration.
- Please read through our Writing and Style Guidelines below before starting your draft.
All steps to completing the integration should live in this guide. It's always good to err on the side of too much information, even if you think something is obvious. By writing your instructions as if the reader has had zero experience with any of the content, you can proactively anticipate any customer questions and greatly relieve Support efforts.
Example:
- Don't: "Find your ClientID and paste it into this field."
- Do: "Navigate to Account Settings in the system menu and copy your Client ID. Next, navigate back to the Configuration page and paste it in the ID field."
Most calls to action include clickable objects or fields, which you should highlight with bold text. This helps the reader follow along in the instructions and denotes when they should be taking action in the UI.
Examples:
- "Navigate to the Configuration menu and select Users."
- "Paste the Integration Key into the Token field"
Summaries before your content may work well when giving a talk or presenting to a targeted crowd, but not in documentation that users are more likely to skim hoping for quick answers. TL;DR: Don't include sentences that just state what you plan on writing about. If you feel you need to add more information that contextualizes what the reader is configuring, include it within the steps, or in a quick summary after them.
Example
- Don't: "In this procedure we will be creating a Topic and a Subscription that will then allow you to create messages that trigger PagerDuty incidents..." etc.
- Do: "1. Navigate to the Topics tab and click Create Topic. 2. Enter a Name, configure your details and click Save Topic. 3. Next, navigate to the Subscriptions tab and click Create Subscription. Enter a Name, select the Topic created in step 1 and paste your PagerDuty Integration Key in the Token field. Click Save Subscription. You have now created a subscription that references your PagerDuty endpoint. When you publish a direct message to your Topic, it will trigger PagerDuty incidents."
The active voice ensures that your writing is clear, concise and engaging. The passive voice uses more words, can sound vague and should be avoided like a zombie plague (rhyme intended).
Example
- Do: "Users can follow incidents and escalations in real-time in Hungrycat’s event stream."
- Don't: "Incidents and escalations can be followed in real-time by users in Hungrycat’s event stream."
- At PagerDuty, we use the Preview tool that comes standard on macOS. Type ⌘ + ⇧ + A or click View > Show Markup Toolbar to annotate images with arrows, rectangles and text.
- Only include screenshots that are absolutely necessary, so that you have less images to continually update when UI changes, etc. We usually only include screenshots when objects in the UI are small or harder to find.
- Ensure that you've obfuscated all sensitive information in your screenshots (e.g., personal account information, integration keys, etc.,) by covering with fake data or an image blur tool.
In a bulleted list, describe the benefits of integrating your tool with PagerDuty. Include specific details on how your tool interacts with PagerDuty. Use our Datadog guide as an example:
- Notify on-call responders based on alerts sent from Datadog.
- Send enriched event data from Datadog including visualizations of the metric/service-level indicator (SLI) that triggered the event.
- Create high and low urgency incidents based on the severity of the event from the Datadog event payload.
- Incidents and escalations are synchronized across both PagerDuty and Datadog as they update.
- Incidents will automatically resolve in PagerDuty when the metric in Datadog returns to normal with bidirectional synchronization.
In this section, write out the basic functionality of the integration with specific details on how events are transformed into PagerDuty incidents. What happens when your tool sends events to PagerDuty (and vice versa, if applicable)? Use the current Datadog guide as an example:
- Datadog metrics that fall outside of a designated range will send an event to a service in PagerDuty. Events from Datadog will trigger a new incident on the corresponding PagerDuty service, or group as alerts into an existing incident.
- Once the metric has returned to its designated range, a resolve event will be sent to the PagerDuty service to resolve the alert, and associated incident on that service.
If there are requirements that user will need prior to completing the integration, list them here. Use the current Datadog guide as an example:
- PagerDuty integrations require an Admin base role for account authorization. If you do not have this role, please reach out to an Admin or Account Owner within your organization to configure the integration.
If you need help with this integration, please contact [YOUR-ORG'S-SUPPORT-CONTACT-INFO-HERE] Note: We need some form of contact from your organization, please do not put PagerDuty's support info here.
If your integration works with Global Event Routing, you can optionally include the following section:
There are two ways to integrate with PagerDuty: via Global Event Routing or on a PagerDuty Service. If you are adding this integration to an existing PagerDuty service, please skip to the Integrating with a PagerDuty Service section of this guide.
Integrating with Global Event Routing enables you to route events to specific services based on the payload of the event from your tool. If you would like to learn more, please visit our article on Global Event Routing. 1. From the Configuration menu, select Event Rules. 2. On the Event Rules screen, click on the arrow next to Incoming Event Source to display the Integration key information. Copy your Integration Key. This is the same integration key you will use for any other tool you want to integrate with using event rules. When you have finished setting up the integration in your tool, you will return to this interface to specify how to route events from your tool to services in PagerDuty.

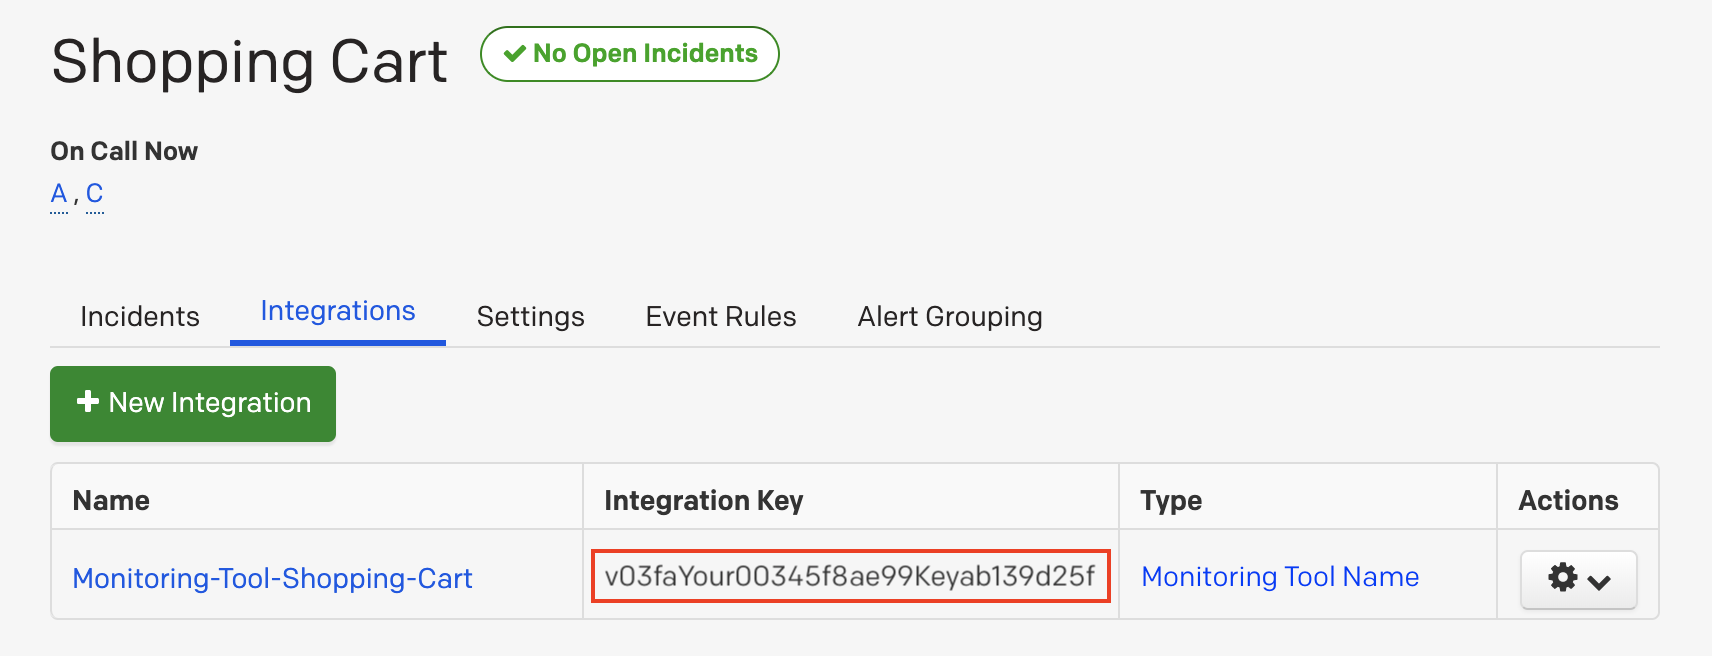
- From the Configuration menu, select Services.
- There are two ways to add an integration to a service:
- If you are adding your integration to an existing service: Click the name of the service you want to add the integration to. Then, select the Integrations tab and click the New Integration button.
- If you are creating a new service for your integration: Please read our documentation in section Configuring Services and Integrations and follow the steps outlined in the Create a New Service section, selecting [PARTNER-NAME] as the Integration Type in step 4. Continue with the In [PARTNER-NAME] section (below) once you have finished these steps.
- Enter an Integration Name in the format
monitoring-tool-service-name(e.g. [PARTNER-NAME]-Shopping-Cart) and select [PARTNER-NAME] from the Integration Type menu. - Click the Add Integration button to save your new integration. You will be redirected to the Integrations tab for your service.
- An Integration Key will be generated on this screen. Keep this key saved in a safe place, as it will be used when you configure the integration with [PARTNER-NAME] in the next section.
Outline the configuration steps in your tool starting here.
Add instructions here on how to uninstall your app (e.g. going to the profile page to revoke access vs. deleting the integration key or extension).