HC32 for May
0ba097e
MAY 2024

Continually updating with Marlin bugfix-2.1.x
⬂ List of recent updates ⬃
What's new in this release
Version: 2.1.3f-5-HC32
⍟If you have not yet updated your LCD by flashing the new DWIN_SET (updated since: November Rev.1), please do so now!⍟
Important
Previous Issue of it restarting when saving/store settings has been fixed. HOWEVER, now there is a current Issue to be addressed:
The screen freezes and restarts when SD card is inserted. This means that everything so far seems to work correctly as it should, except for when an SD card is inserted, so printing may not be possible unless you use USB serial interface to upload the file (through a slicer or something like Pronterface).
(However, it should be noted that it may not yet be fully available for "H32" labeled printers having the monochrome 12864 LCD screens)
BTT SKR Mini E3 V3 / V2 / V3.0.1 finally supported for ProUI - (4.3" Stock Aquila/Ender-3V2 Color LCD)
If you have a TFT or other display, you can request firmware *.bin files to be made, or compile your own
How to install the firmware
This is a universal firmware that has been optimized and enhanced for both the Voxelab Aquila and Creality Ender-3 V2/S1. This is based on MriscoC's Professional Firmware for the Creality Ender-3 V2/S1. This particular build release is for the LCD color displays of Voxelab Aquila or similar variant. If you are using a Creality brand screen or experience the encoder knob direction backwards, you can try the -TJC version, or the Ender-3V2 build here.
Tip
To update the firmware, choose the file ending in .bin and place it in your SD card:
(You may need to rename the file if reinstalling or if it doesn't flash the first time)
- For JyersUI version go here.
It may have less issues. - Use the regular Aquila build here.
If you DO NOT have an HC32 chip.
Important
🚩
To use this version, you must✶ update the DWIN_SET to the LCD screen. New ICON's have been added, and others were remastered.
- Choose a DWIN_SET from the "display assets" folder
- Copy it to the root of an SD card
- Remove the name in ( ) from the folder
e.g. "DWIN_SET (Original)" => "DWIN_SET" - Open the back of the LCD, insert the card📲
- Turn on power, wait until the screen goes Blue🔵 to Red🔴
- Turn off, remove card⤵. Good to go!✅
✶ technically you don't have to reflash the new DWIN_SET, but some ICON's will be missing if you do not.
Warning
🚧Please be aware of the following:
While using _BLT- or _MM- versions, if you encounter the bed Mesh not saving...
This workaround resolves the issue without having to redo the mesh again.
- Build Mesh (first time)
- Save Mesh
- After any time you Power Off and Power On -->
3a. Go to Control/Advanced Settings/Load Settings
-OR-
3b. Load this into your Start Gcode
G28 ; Home
M501 ; Load settings
M420 S1 ; Pull your mesh bed level
;(Remaining Gcode / Start Print)>>>
If you experience this issue as it starts printing --> Mesh leveling data is drawing over the printing screen
Go to Slicer Gcode Scripts
Note
⍰ The follow may apply to you if the mainboard chip supports 256KB max
Note ➀: Due to lack of flash memory space in the Aquila's GD32/N32|F103RCT6, some features had to be disabled in the ProUI of UBL and BLT versions, including, but not limited to:
- Configuration.h -----------------------------
- Configuration_adv.h -----------------------------
Note ➁: The latest releases are promoting UBL versions over ABL (BLT - BL Touch), but ABL/BLT versions will be available. MPC autotune is available for the hot-end as a replacement to PID autotune.
📚Versions
- [ _Default-NP ]: Use if you have a near stock machine Default No Probe
- [ _MM ]: Create a bed mesh without an auto bed probe Manual Mesh Bed Leveling
- [ _BLT ]: Use if you have a CR/3D/BL-Touch level sensor installed. Bilinear Auto Bed Leveling
- [ _UBL ]: Similar to both MM and BLT - with more options. Recommended over BLT Unified Bed Leveling
You can download the firmware's latest files from the Assets at the bottom of
the release page.
UBL Information
Binaries with UBL in their filename are similar to the bilinear leveling of BLT, but with extra features to provide users with more control and information. There are multiple guides about UBL, it's recommend reading about it before using this type of leveling system.
- https://all3dp.com/2/marlin-ubl-unified-bed-levelin-simply-explained/
- https://www.3dmakerengineering.com/blogs/3d-printing/unified-bed-leveling-marlin
- https://hackaday.com/2022/01/14/3d-printering-getting-started-with-universal-bed-leveling/
Special versions
- [ -ProUI ]
| ProUI | (ProUI ENABLED)- Toolbar, Gcode model preview, and other special features and options
- [ -NoPro ]
| No ProUI | (ProUI DISABLED)- Does not have some features listed, but may include others not enabled in ProUI - see NOTE above
- [ -IS ]
| Input Shaping | Only if you mean to do the initial calibration- (May require a special breakout board or test prints (similar to Linear Advance), more information below)
- [ -MPC ]
| MPC Autotune | (replaces PID for hotend)
Related Information
- All firmware version types have Linear Advance enabled
- Linear Advance - M900
- Input Shaping is enabled with files ending with "-IS"
- Input Shaping - M593
- MPC is enabled in firmware files containing "-MPC"
- Model Predictive Temperature Control
- MPC has proven to be a better algorithm for keeping the nozzle temperature stable, and is also very useful for high power heaters. It does take some getting used to how it works if you are unfamiliar with it. It's recommended for advanced users, so stick to the default PID versions, especially if your printer is relatively stock
Teaching Tech - Input Shaping: Step by Step guide
Chris' Basement - Marlin Input Shaper
✨Firmware Features
- Universal Marlin Support
- - Support for Model predictive temperature control "MPC"
- - Support for Linear Advance
- - Support for Input Shaping
- DWIN / DACAI / TJC / SYNWIT display support
- Up to 300°c Hotend♨️
- Improved support for Manual Mesh and CR/3D/BL-Touch
- Manual and Probe Assisted bed tramming
- Tramming Wizard for Auto Bed Leveling versions
- Calculate corner values of the bed, for easier bed tramming
- Set Bed Screw Inset to easily find each corner
- Editable physical dimensions (X/Y bed size and Z height)
- Selectable mesh point grid from 3x3 to 9x9
- Mesh editor for fine tuning Mesh Points
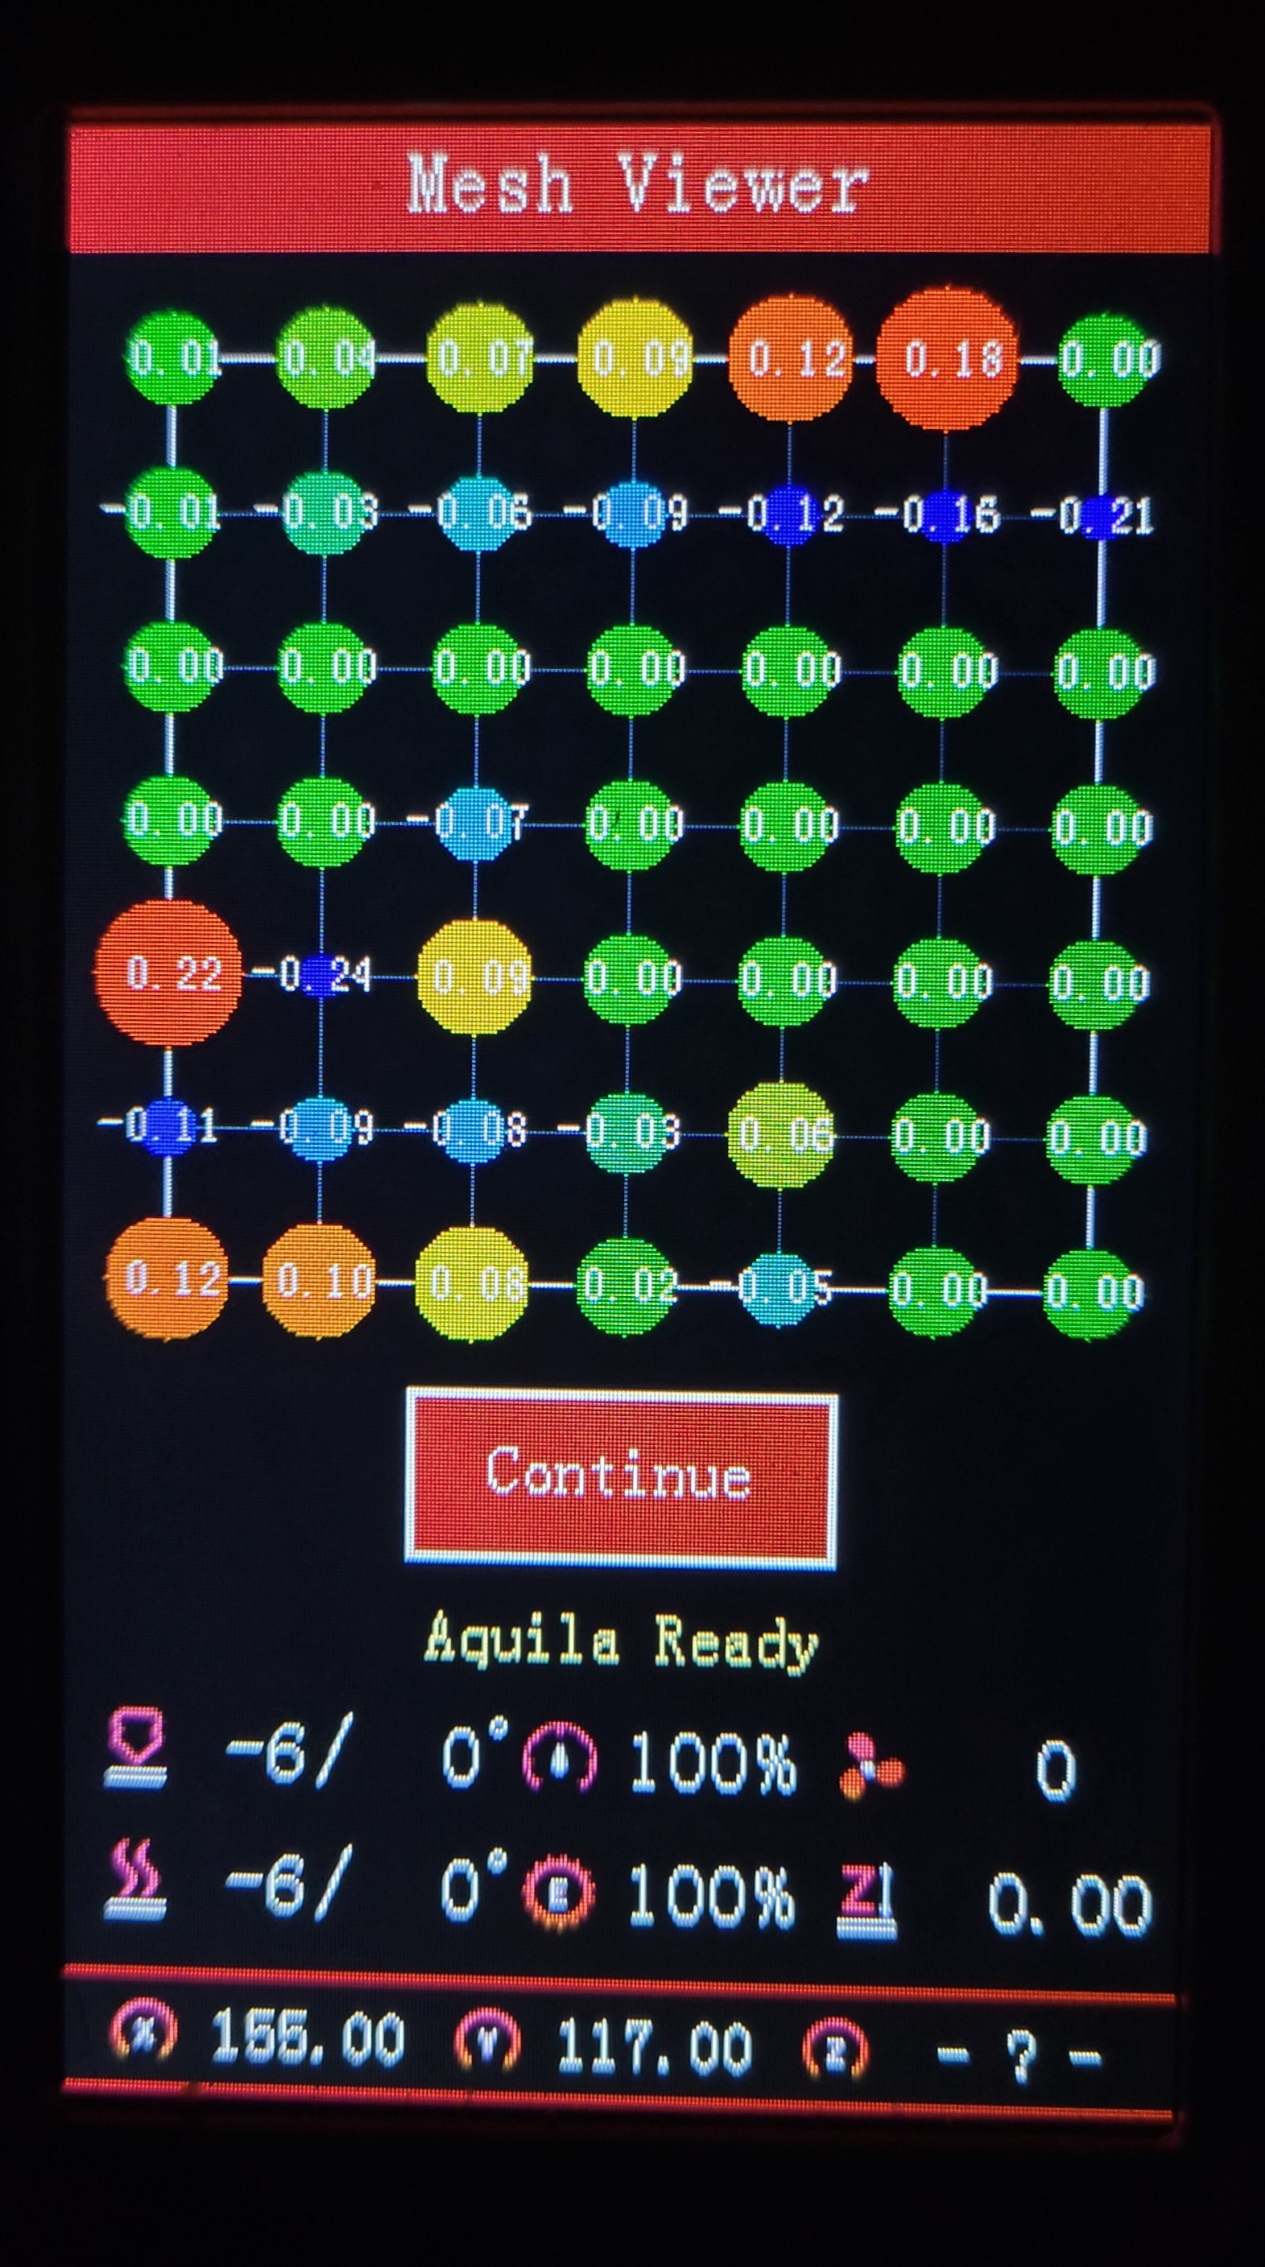
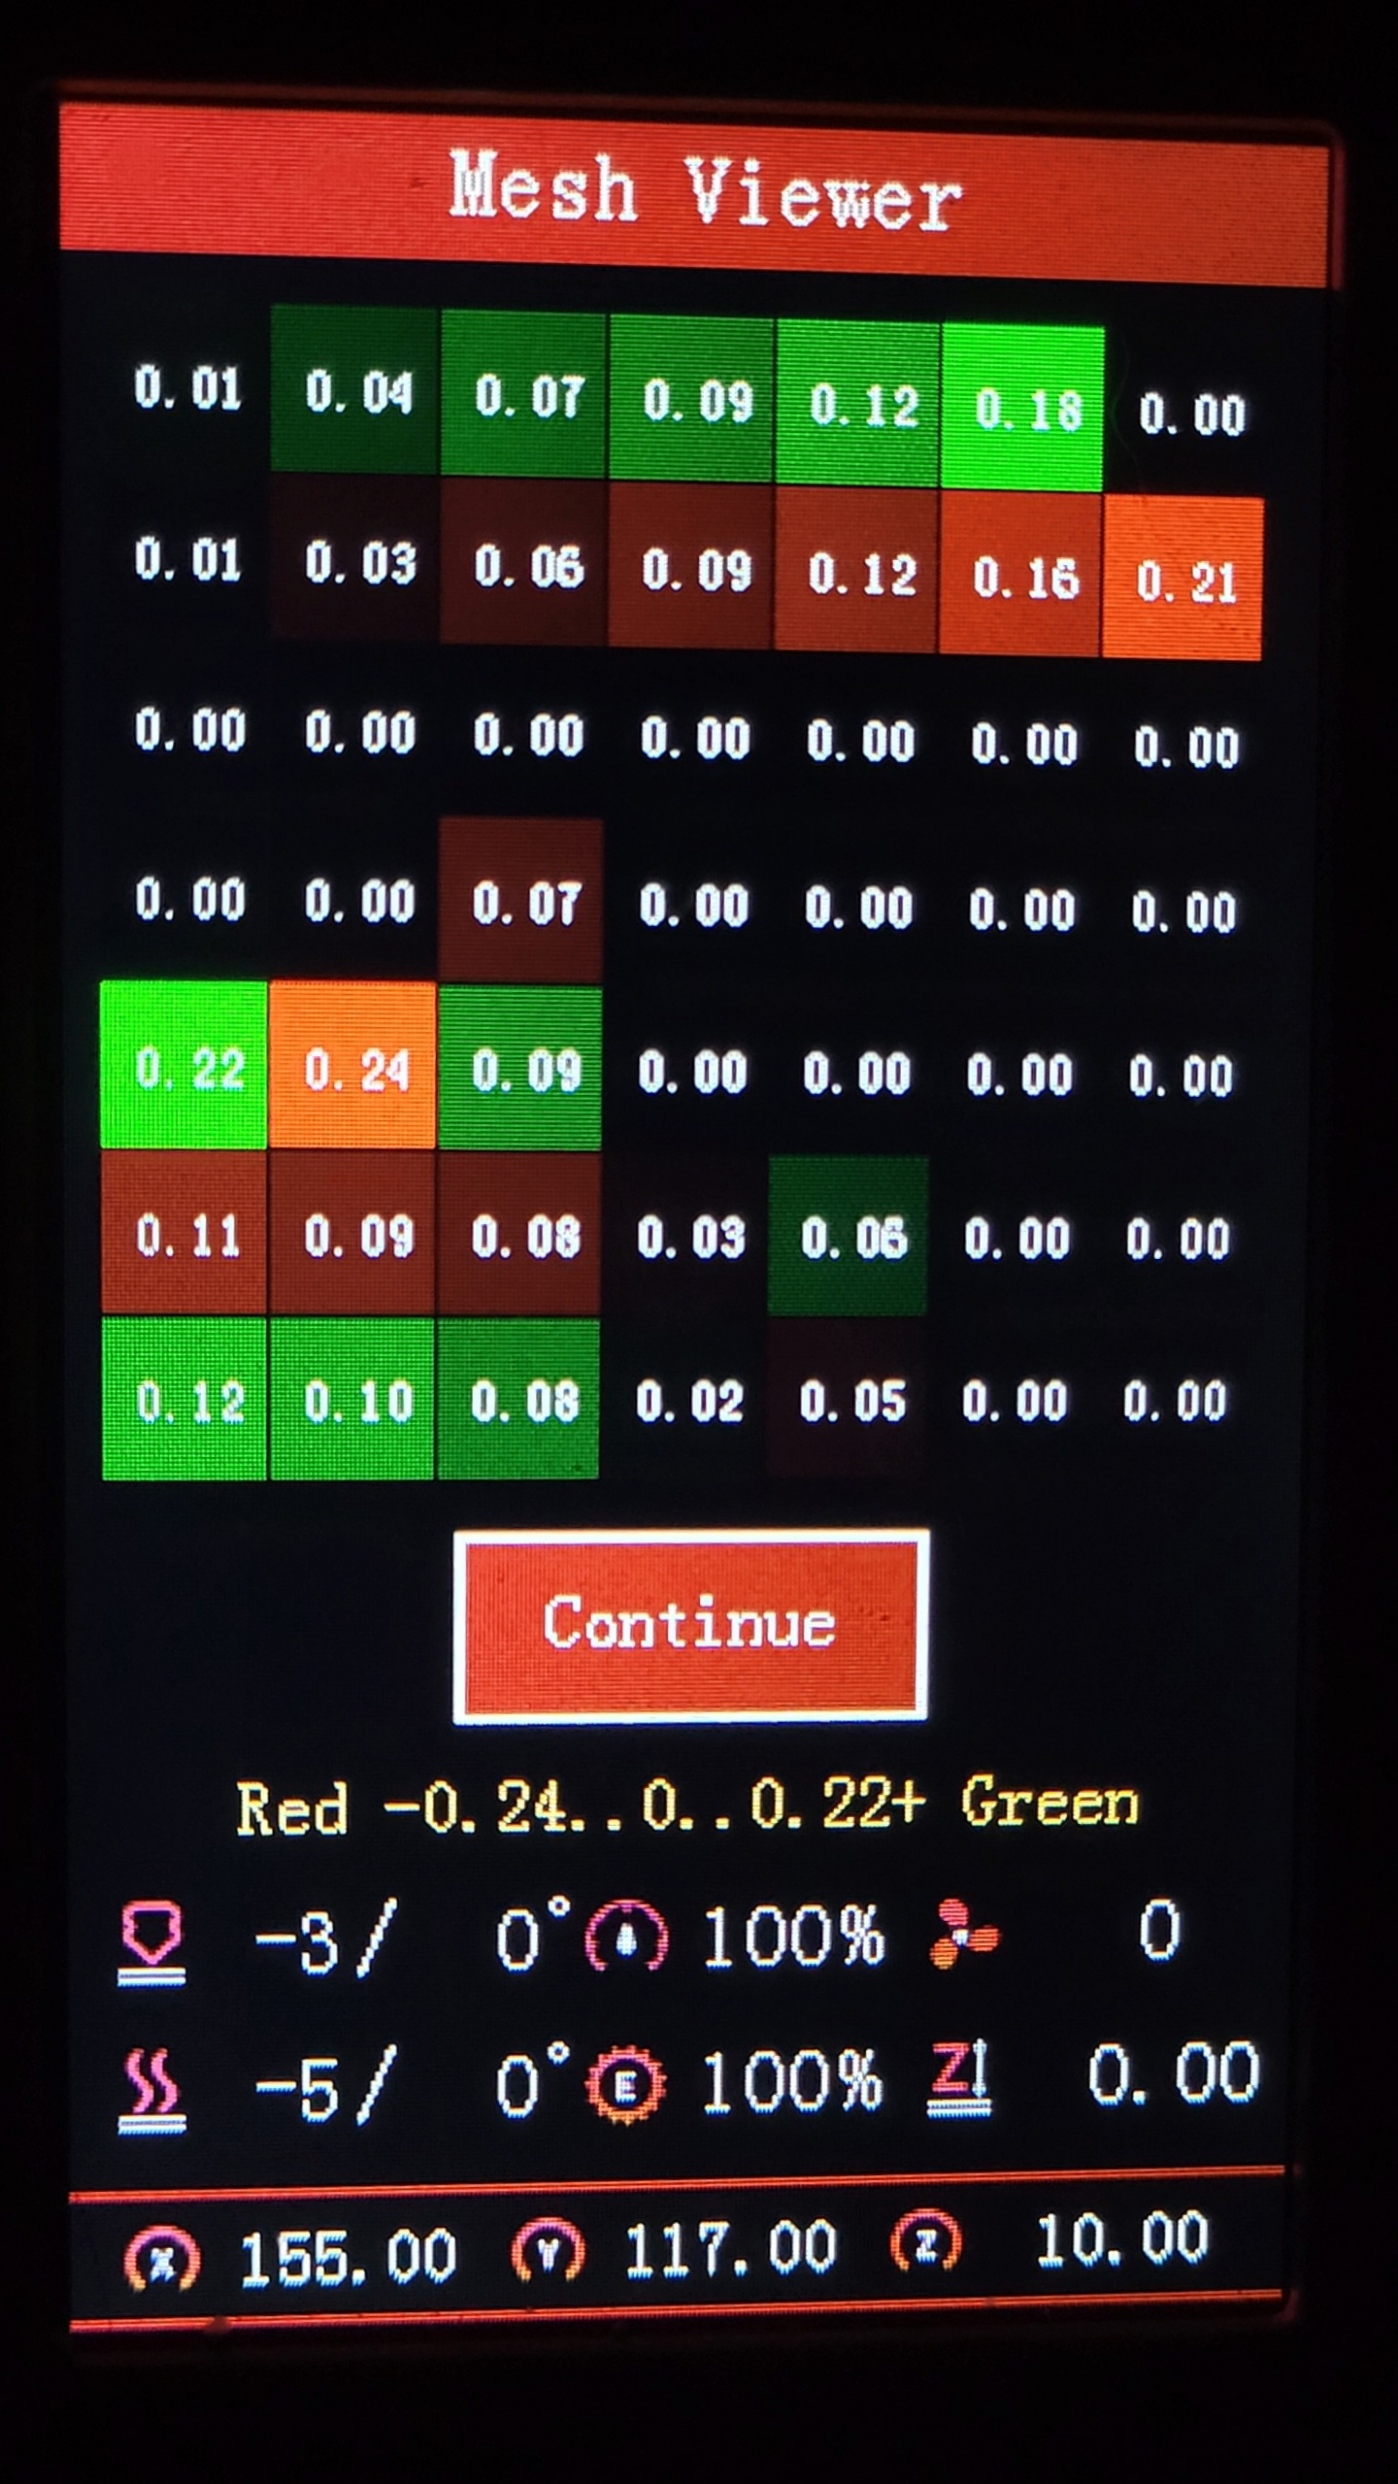
- Improved Mesh viewer (two types of viewers)
- Customizable Color theme
- Long filename support with scroll
- Baby Z-Stepping
- Probe Stow/Deploy/Reset menu items
- M48 Probe Test to Probe Settings menu
- Firmware Retract: adjust retraction settings while printing
- Filament management - Advanced pause features
- - change filament mid-print (park head/unload/load)
- Configurable park-head position (default x=0 y=220 z=40)
- Home axes after disabling motors
- Configurable Z feed rate
- Live move for all motors
- Support for S-curve Acceleration
- Restart printer menu item
- Allow invert direction of the extruder
- Support for filament runout sensor
- - Selectable runout filament sensor active state (LOW/HIGH/MOTION)
- - Editable runout distance
- Support for SD card extension (Auto-mount menu item)
- PID settings menus with viewable temperature plot graph
- - Able to view Bed or Nozzle temp on a graph during printing
- Lock screen
- Customizable pre-heat functions
- Enable/disable encoder beep/tick sound
- Preview g-code thumbnail (use this guide)
- New print done screen
- Two decimal positions for axis coordinates value
- Z-Offset wizard
- Editable minimum extrude temperature
- Turn off the LCD and Adjustable Brightness
- - LCD Timeout - Automatic turn off (Screen Saver)
- Individual axis homing
- Enable 250000 or 115200 bauds
- Power failure / power-loss recovery
- Enable/Disable Adaptive Step Smoothing
- Z-Offset icon blinks to indicate active mesh leveling
- Live End-stop diagnostics
- Printcounter and Statistics
- Toolbar with 11 configurable shortcut actions.
This shows the two types of meshviewer as an example
The newer colorful one has a more rainbow like characteristic

Select Color Menu
Octoprint bed visualizer support

🔍More info on the 🌐Wiki pages
Requirements
Compatible main boards with the following chips:
- GD32F103RCT6
- N32F103RCT6 / N32G455REL7
- Creality V4.2.2
- Creality V4.2.7
- STM32F103RET6 *some versions may not fit into RCT6
- BTT SKR Mini E3 V3 / V2 / V3.0.1
- STM32G0B1RE / STM32F103RC / STM32F401RC
Compatible LCD Screens:
- A DWIN color display with encoder knob
- For using ProUIONLY DACAI, TJC, or SYNWIT displays may be used if enabled
- The following Touch or legacy monochrome screens are not supported by ProUI:
- Aquila Pro / D1 / C2
- Ender-3 / Pro
Firmware files not yet posted under Assets may be available at a later time.
Feel free to make a request for anything specific.
You can still use this source code to compile firmware for other printers, but they will not be able to use the Professional User Interface without the specific LCD screen. In that case, you rather use the most current Marlin source code. You may also modify your printer to meet these requirements.
Special Contributions:
@Nazar78
@gcardoso22
@wlkmanist